The Graph Editor
Where strategies actually get built. A drag-and-drop flowchart that decides what to bet, when, and what to do next.
This is the deepest part of Spin Savvy. The graph editor is where a "strategy" stops being just a recipe in your head and becomes a real, runnable piece of logic. It looks like a circuit board: little cards (called nodes) connected by lines (called connections). The wheel spins, the strategy walks the graph, and out the other end comes either a profit or a loss.
Don't be intimidated. The pieces are small and there aren't many of them. We'll cover everything in five short pages.
- This page. Canvas tour, gestures, the toolbar, the inspector, save behavior.
- Node Types. The five kinds of node and what each one does.
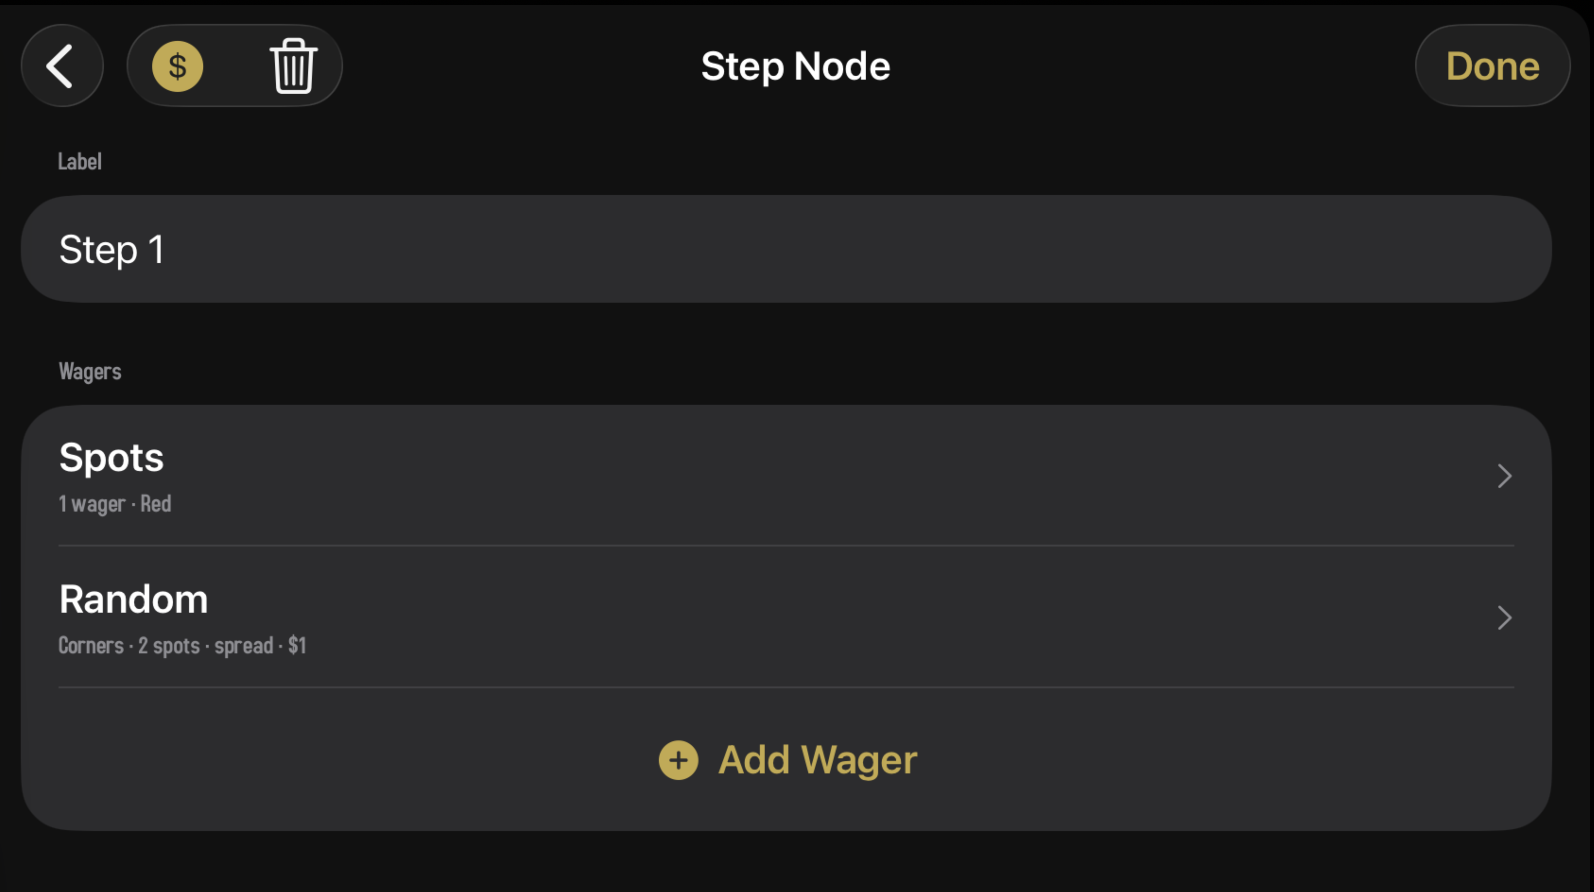
- Wager Groups. How a Step decides what bets to place.
- Action Nodes. All the action types: Martingale, Fibonacci, Parlay, and friends.
- Decisions & Flow. How the strategy walks the graph spin by spin.
- Build Your First Strategy. A worked example from blank canvas to a working Martingale.
Opening the editor
Three ways in:
- Create a new strategy. Tap the + button at the top of the Strategies list. A blank strategy is created and the editor opens automatically.
- Open an existing strategy. Tap any strategy you own to view its overview, then tap the Graph button in the top toolbar.
- Inspect a community strategy. Open any community strategy and tap Graph on its overview to see how it's wired. Strategies authored by other players are always read-only — even for subscribers. To make changes, duplicate the strategy first and edit your copy.
Creating new strategies is part of the Subscriber tier. Free-tier users can still edit, play, and simulate strategies they already own — they just can't add new ones. Strategies authored by other players are always view-only, regardless of tier; duplicate them to make your own version. Subscription details →
The canvas
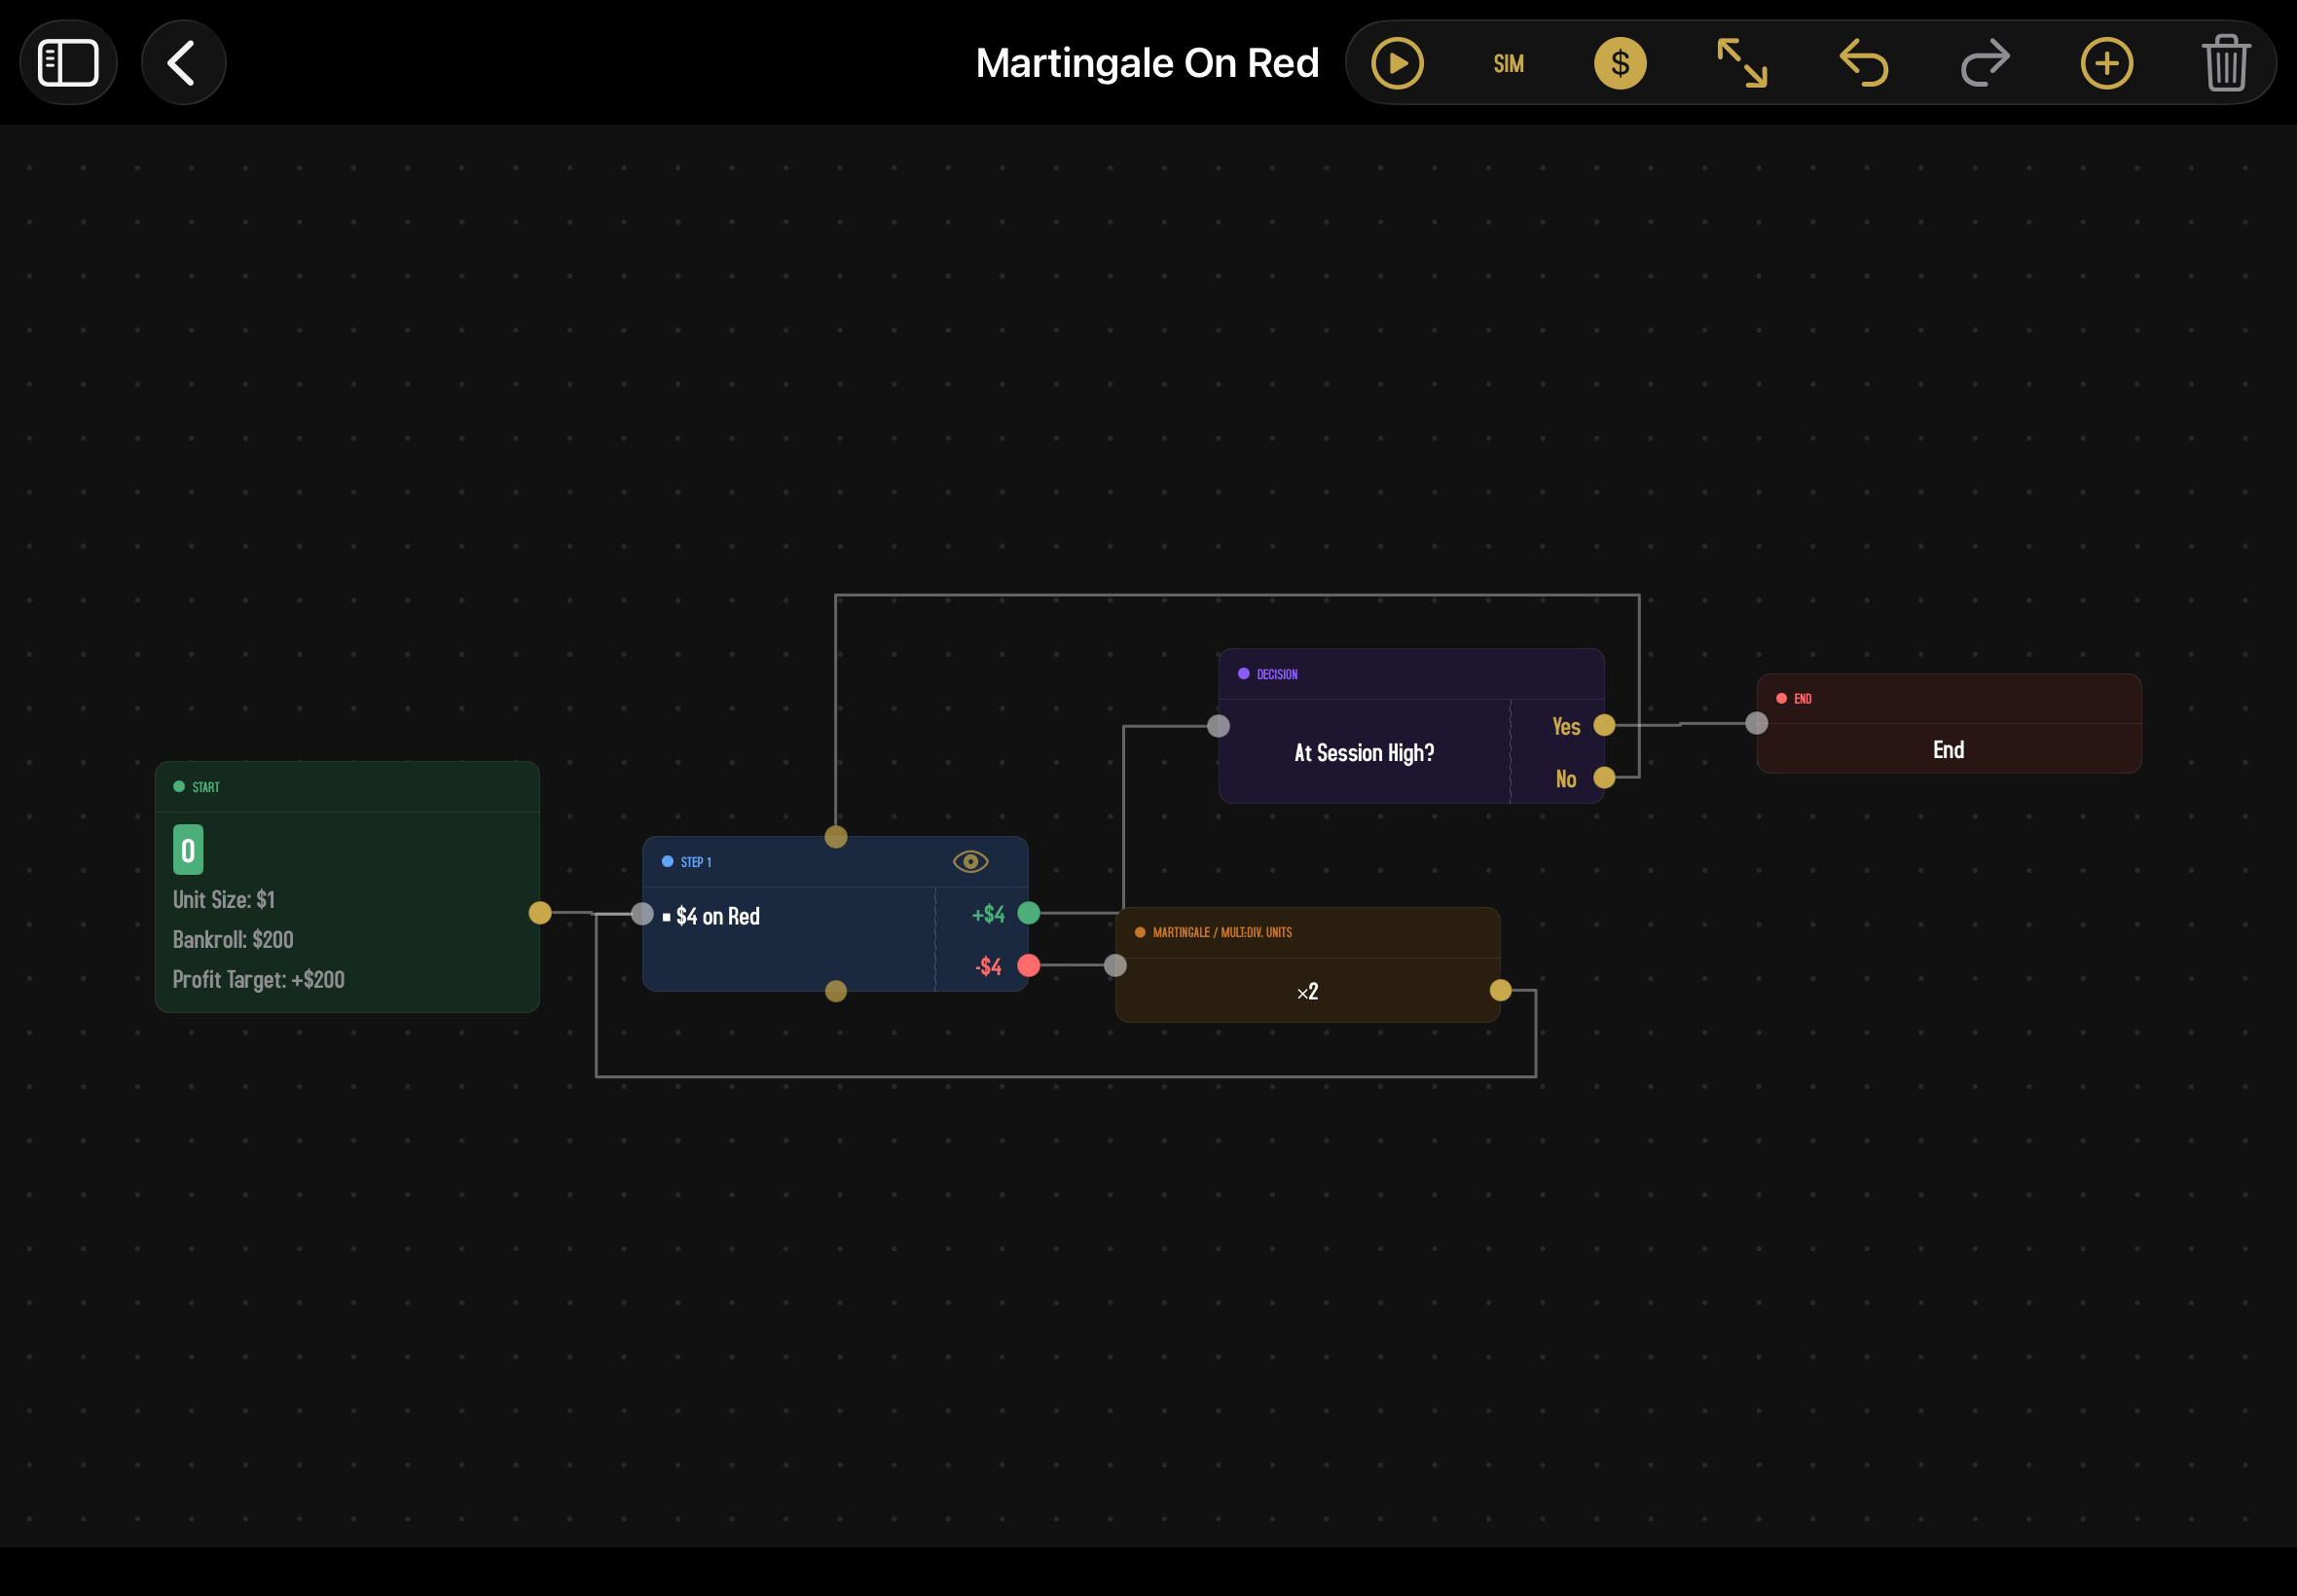
The whole editor is one big scrollable, zoomable workspace called the canvas. Nodes float on it, connections draw between them, and the toolbar across the top gives you the controls.
Out of the box, the canvas displays every wager and outcome in dollars (e.g. "$5 on Red," port labels like "+$5"). Roulette systems are traditionally written in units (chip multiples) so the same strategy works at any stake level, so we keep the option: tap the $ button in the toolbar to flip the display between dollars and units. The toggle is cosmetic; the underlying strategy is the same. It's a single app-wide setting, so flipping it on the canvas also flips it on the node inspector, the wager editor, and the simulation setup screen — set it once and everywhere agrees. Throughout this guide we use dollar notation, since that's what you'll see by default.
Getting around
| Gesture | What it does |
|---|---|
| One-finger drag on empty space | Pan the canvas |
| Two-finger pinch | Zoom in or out (limits are roughly 15% to 400%) |
| Single tap a node | Select it (gold border appears) |
| Double tap a node | Open its inspector |
| Long-press a node | Context menu with Duplicate and Delete |
| Drag a node | Move it around the canvas |
| Drag from a node's output port | Start drawing a new connection |
| Single tap a connection | Select that connection (gold highlight) |
If you ever lose your bearings (zoomed too far in, panned off into space), tap the Fit to View button on the toolbar. It snaps the canvas back so all of your nodes fit on screen at once.
Nodes and ports
Every box you see on the canvas is a node. There are five types, each with its own color:
- Start (green). Where every strategy begins. Carries the table type, starting bankroll, unit size, and exit conditions.
- Step (blue). Place wagers and spin. Each step is one spin of the wheel.
- Action (amber). Modify your wagers without spinning. Doubles your bet, resets to base, copies wagers from elsewhere.
- Decision (purple). Branches the flow. "Are we covering at least 12 numbers? Go this way if yes, that way if no."
- End (red). The session is over.
Each node has tiny circles on its edges called ports. The port on the left edge is the input: connections come into the node here. The ports on the right edge are outputs: connections leave the node from here. Step nodes also have small reset ports on their top and bottom edges, used for special "reset back to here" connections.
Step nodes have one output port for every distinct outcome of their wagers. If your bets can win or lose net, that's two ports. If they can win, lose, or push, that's three. Decision nodes have two output ports: Yes and No. Action and Start nodes have one output port each. End nodes have zero output ports because the session has ended. The Router kind on the Decision menu is the one exception: it has a single output port that accepts multiple outgoing connections, picked between each time the strategy reaches it.
Connections
To wire two nodes together: touch and hold the output port on the source node and drag a line to the input port of the target node. A dashed line follows your finger as you drag. When you get close to a valid input port, it highlights, and releasing snaps the connection into place.
If you let go far away from a port, nothing is created. If you let go on a port that's already wired up to that source, nothing changes either, since duplicates aren't allowed.
Loop-backs
You can absolutely connect a node's output back to a previous node's input. That's a loop, and it's how Martingale-style strategies work: lose a spin, run an action that doubles your bet, loop back to the same step, and spin again. Loops are a normal part of strategy design, not a mistake.
Deleting a connection
Tap the connection line so it highlights gold, then tap the trash button on the toolbar. Or select the connection and press the Delete key on a hardware keyboard.
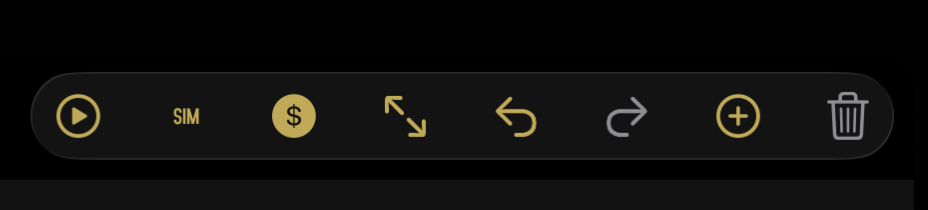
The toolbar
| Button | Does |
|---|---|
| Play | Drop into Play Mode using this strategy. Triggers the dead-end check first. |
| Sim | Open the simulation setup screen. Same dead-end check. |
| Currency / Units toggle | Flip the canvas labels between dollars ($5) and units (5u). Defaults to dollars. Doesn't change the strategy, only how the cards display. |
| Fit to View | Zoom and pan so every node fits on screen. |
| Undo | Step backwards through your recent edits (up to 30 steps). |
| Redo | Reapply something you just undid. |
| + Add | Add a new node. Opens a menu with Step, Action, and Decision options — see The Add Node menu below for the full layout. (Wait For… lives inside the Decision submenu because the two work in similar ways — both pause and check spin history.) |
| Trash | Delete whatever's selected, whether it's a node or a connection. |
On a phone, the toolbar collapses some controls into an overflow menu. The same actions are all there; just behind a "more" button.
The Add Node menu
Tapping + opens a short top-level menu — Step Node, Action Node, and Decision Node — with the two submenus grouped by what each node does, so related options sit together and dividers separate the groups.
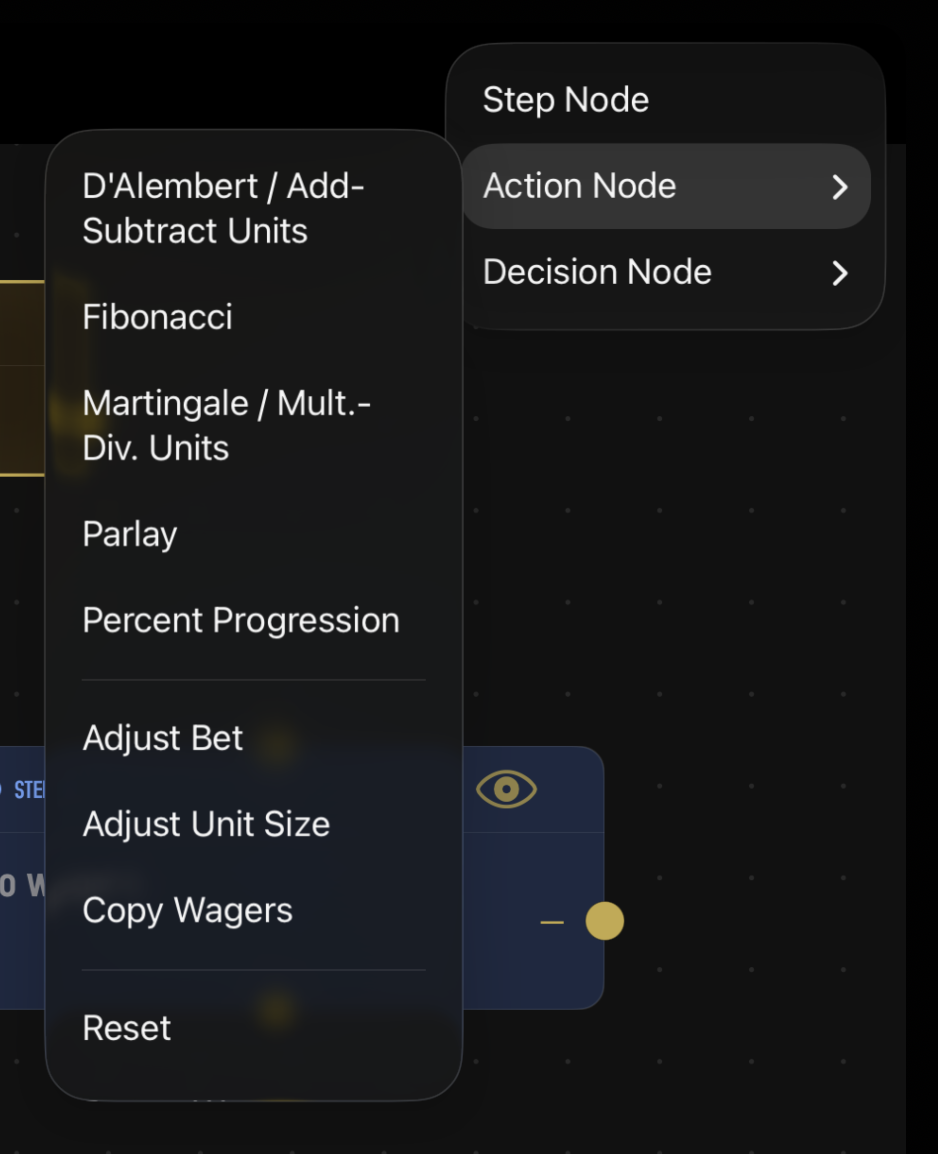
The Action submenu has three groups: Progressions (Martingale-style escalations like Fibonacci and Parlay), Manual adjustments (Adjust Bet, Adjust Unit Size, Copy Wagers), and State (Reset, Revert Wager, Reset Counters). End Node sits at the bottom on its own. The Decision submenu groups by what's being checked: profit and position, coverage, streaks, and flow control. Within each group the options are alphabetical, so the same item lives in the same place every time.
The inspector
Double-tap any node to open its inspector: a full-screen view that pushes in with every field you can configure for that node. Settings are organized into sections (Label, Wagers, Condition, etc.) and there's a single Done button in the corner — along with a back chevron — that returns to the canvas and saves your changes.
Different node types show different inspector fields. We cover the specifics on the Node Types page and in the dedicated pages for actions, decisions, and wager groups.
The Start node's inspector is where you set Unit Size, Starting Bankroll, and Profit Target. When you change the unit size, bankroll and target rescale automatically so the number of units stays the same — drop a $100 unit to $10 and a $10,000 bankroll becomes $1,000, with the profit target scaled to match. The $ button in the inspector's toolbar flips the display between dollars and units (same app-wide toggle as the canvas).
Saving
There's no Save button. Every change you make (adding a node, dragging it, editing a field, drawing or deleting a connection) is saved automatically the moment you make it. Close the editor any time you want; nothing is lost.
Undo works across most of these saves. If you delete a node by accident, hit Undo and it comes back along with all of its connections. The undo stack holds the last 30 changes per session.
The dead-end check
Strategies have one rule: every output port has to go somewhere. If a Step has a "loss" outcome with no connection coming out of it, the strategy doesn't know what to do when you actually lose. We call that a dead end.
The editor doesn't stop you from creating dead ends as you work, since you're often half-finished. But the moment you tap Play or Sim, the editor checks every node and refuses to run if any dead ends exist. You'll see an alert listing exactly which nodes are unfinished, so you know what to fix.
An easy way to avoid dead ends: as you add each new step or action, immediately wire its output up to something, even if it's just looping back to the previous step. You can always re-wire later. Empty output ports are easy to forget.
What's next
That's the whole canvas. Onwards to the actual building blocks:
- Node Types → What each of the five node types does, and what fields each one has in the inspector.